

Showing posts with label handmade jewelry. Show all posts
Showing posts with label handmade jewelry. Show all posts
Sunday, January 18, 2009
Featured in another Etsy Treasury
Hi, KnotChaCha was kind enough to feature one of my pieces, Pretty in Purple, in an Etsy Treasury collection today. To view it, click here. Note, it's only available until 01/20 3:45pm.
Wednesday, December 3, 2008
Yay! It's finally out! And still out of my hands...
 I have been waiting and waiting for the Winter 2009 edition of the Belle Armoire Jewelry quarterly magazine to come out and it's finally available!
The reason I am excited is because it contains a feature on my silver tree jewelry. Sadly, none of my local stores have it in yet but they should in the next week or so. In the meantime, it is availabe on the Somerset Studio (Publisher) website here.
A few months ago the editor contacted me because she saw my work on a website and liked it. She asked me to write an article and submit 3 pieces along with instructions and photos of the work in progress.
Below there is a tiny sneak peak per the proof I received from the editor showing my article, my hands at work and their photography of my pieces.For a full size readable version, please pickup a copy of the magazine!! Michaels and Ben Franklin craft stores and other large chains sell the magazine. Also many bead stores and larger magazine stands. Barnes and Noble and Borders have it sometimes too.
I received an email from the editor today asking me to submit another article for their next issue by Jan. 15th! I better get to work! I have an idea in mind for what to write about, but it's a secret. Neener, neener. =oP

Saturday, November 22, 2008
Wire that Wows!
As any jewelry lovin' artsy craftsy gal knows, there's about a million ways to make jewelry - metal clay, beads, shrink plastic, polymer clay, soldered glass, fused glass, metalsmithing, nuts and bolts & bubble gum. OK. Maybe not the gum, but you get the idea that there's lotsa ways to make bling.
Just about all of the aforementioned methods for making jewelry call for incorporating some form of wire work on occasion, either to enhance the appearance or for function. It may be as simple as making a loopy bail, earring hooks or wrapping a stone, but wire has always been an important element of jewelry making. Wire even stands on it's own as a primary jewelry making medium. Take a look around your local craft store and you will find there are many kinds of wire and tools to make it do something funky.
OK. I do about every craft known to woman so why have I not got in to wire more? Well, because a lot of what I have been exposed to in craft and bead stores, while fun, is also semi gaudy or seems to be geared towards kids or casual looks that's just not me. However, I have stumbled on some truly inspiring wire work from a fellow Etsy artist that is elegant and creative. I just have to share some of this awesome work with you.
Here are some pieces from juliadesigns. Please visit her online store to be wowed further. She even offers tutorials so you can create some pieces for yourself:


Sunday, October 12, 2008
How to Make Your Own French Hook Earwire Findings
I make fine silver jewelry. Fine silver is .999% pure silver. Sterling is .925. In the stores, pretty much all you can find is Sterling Silver findings. Since I want the metal content of my jewelry to remain pure as much as possible, I taught myself how to make my own findings including S hook clasps, toggle clasps, bails, jumprings, headpins, and earring wires. Eventually I started making larger quantities and wholesaling them to a local bead store. I also sell fine silver findings via my online bead store when I have enough.
I think making findings is pretty fun so I would like to share one way to make french hook earring wires so you can have fun too. Now some of you might be thinking, "If you want to sell these, why would you tell people how to make them?" Well, I am banking on my theory that creative "do-ers" will always find a way to make something vs. buy it whether I tell 'em or not. And people who find this kind of thing tedious will continue to exercise the convenience of just buying what they need, and hopefully they will buy it from me sometimes. =o)
How to make "Q-end" French Hook Earring Wires

Materials and Supplies
20 Gauge Wire (copper, fine silver, sterling silver-dead soft or half hard)
Flush Cutters
Large & Small Round Nose Pliers (Looping pliers)
2 smooth surface pliers
Cup Bur (for rounding the end of the wire)
Steel Bench Block
Chasing Hammer
Hearing Protection
3/4" Wooden dowel or Foam Brush Handle (used as a mandrel to shape the hooks)
Candy that's yummy
Steps
1. Cut pair(s) of 2 1/4" pieces of wire with flush cutters.
2. Secure each end of a piece of wire in smooth surface pliers and pull to stretch until strait.
3. Hammer the one end (1/4" or so) of each wire flat on the steel block.
4. Use the smallest end of the small round nose pliers to curl the flattened end into a loop.

5. Now switch to large round nose pliers. Grip the wire with the small loop on top of the pliers, facing you. Curl the strait end of the wire back, and up until it touches the little curl.

6. Pound the hook you just formed flat at the point that is farthest from the little curl. Eat some candy to celebrate your progress! You are 1/2 way done.

7. Hold two wires together with the loops facing you, right next to each other. Use your thumb to press the wire to the dowel or wooden handle of the foam brush, holding them just above the curls.
Push the straight wires around the dowel/handle until they almost come around and touch the curls.

8. Use the flush cutters to even out the strait tails of the hooks. Ideally the back should be longer than the front curls. (I do 4 at a time)

9. Use the cup bur to round and smooth the end of the wires so they won't injure the wearer. Eat some candy to reward yourself for being a considerate jeweler!

10. Use the large round nose pliers to grasp the straight part of the wire about even with where the curl is on the other side. Curl the end to put in a gentle curve that will help the wearer put the earring on easily.

11. To give the wire more strength to hold it's shape, you will need to flatten the curve of the hook just before and after the part that will rest in the ear. Do NOT flatten the part that will be in the ear or it will become sharp which is dangerous and uncomfortable to wear.

You are done! Eat some candy! For extra shine you can tumble the ear wires, or for a vintage look, antique them with patina. There are many shapes, sizes and varieties of earring wires you can make. This is just a really fun and easy one that looks great!

Saturday, October 4, 2008
Torch Soldering vs. Soldering Iron
There are several posts on my blog regarding making soldered glass slide and pebble jewelry. That application calls for using a soldering iron, like those used for connecting pieces of stained glass. The basic elements of that method of soldering apply to torch soldering as well.... metal-to-metal contact, the use of flux to flow the solder, the use of solder & a heating tool that reaches the temperature that is necessary to melt the solder. But the methods are not necessarily interchangeable. For example, you cannot use torch soldering to make the glass slide pendants. The heated area is too broad and too hot. The copper tape & paper artwork would melt and the glass would shatter. But the torch method is the best choice for heat connecting precious metals like silver. A soldering iron tip must be touching the solder to melt it and therefore, it would get in the way when trying to make the small unnoticeable connections that are desired for finer jewelry, whereas the torch only needs to be in proximity to the area of connection to form a heat source that will melt the solder and draw the molten liquid to it. The torch is hot enough to melt solder with a higher precious metal content than the soldering iron generally, so for that reason it is preferred for fine jewelry as well.
There are a few pre and post solder steps that are required when torch soldering silver. When silver (other than pure fine silver or argentium silver) is exposed to high heat, it gets something that is called "Fire Scale" which totally discolors the silver and it is very difficult to remove because it goes deep into the metal. This happens because of the copper content that is alloyed in sterling silver. For this reason, I work with fine silver only, but sometimes the strength of sterling is necessary.
To avoid fire scale, you can prepare the pieces of silver by soaking them in a prep solution designed specifically to address fire scale. Also, some people lay the silver on a chunk of natural charcoal (not BBQ charcoal!) when soldering to help absorb oxygen which is in part to blame for fire scale.
I found this information in the Art Jewelry Mag forum by "bleugurl" but I have not personally verified it:
"To prevent fire scale, stop oxygen from getting in contact with the metal. Fire scale is formed whenever silver and sterling is heated above about 1000 degrees F. Oxygen combines with copper to form cuprous oxide which exhibits as firescale.
Prips Flux, denatured alcohol/borax solution, Cupronil…any of these products will work. You might try coating the whole piece in flux before soldering. Be generous with the flux. To properly apply anti-firescale-fluxes, the metal must be heated slightly. Paint, dip the piece or spray on the anti-fs-flux. A mist atomizer bottle works well here. If the metal temperature is correct a white grainy coating will form. Quickly play a flame across the wet fluxed metal to dry it. This will evaporate the alcohol, leaving a white coating of tiny borax crystals."
After soldering, the piece must be pickled to clean all of the residue and flux from it.
This video created by http://www.cooltools.us/ demonstrates how to coat your pieces with prep solution and some handy tricks for soldering small parts like jump rings with a torch. Check it out. I hope it helps you as much as it helped me.
Here is another video demonstrating another method for coating with flux & torch soldering on a piece of charcoal:
Happy soldering!
Sunday, March 23, 2008
How to Make Jewelry from Glass Microscope Slides & Solder
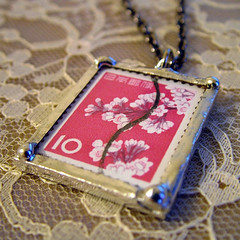
If you are into handcrafted jewelry, then you may have already seen or heard of jewelry made by using 2 glass microscope slides to sandwich flat items, which are then soldered around the edge to make a solid piece. Loops are soldered to the top and/or bottom to act as connection points. These are mini framed pieces of art that are as much fun (with practice) to make as they are to look at and wear.
Sample pic is from flickr user "Ashe-villain" who allowed the blogging option (thanks). Visit her store.
What do you need to create this fun art you can wear?
Microscope Slides or other polished edge small uniformly shaped glass piece
Glass cutting tools (optional - only if you want to do a size other than your pre-cut glass)
Stuff for inside the "glass sandwich"
1/8" Copper tape - the type used for stained glass
Burnishing tool
Shiny silver jewelry grade Lead-free solder and compatible flux that matches temp of soldering iron
Small disposable non-plastic paint brush to apply flux
Wire or jump rings
Pliers
Damp Sponge
Glass cleaner and lint free towel
Soldering Iron & sturdy stand
High heat resistant work surface
Well ventilated space
Clamps or "third hand" tool to hold the slide in place while soldering
Safety goggles
Instructions
What can you put inside the slide sandwich?
The possibilities for what you can put inside is limited only by the fact that it must be pretty thin flat, and able to stand the heat of the soldering iron near it. I have seen paper collage, feathers, lace, photos, pressed flowers, glitter, confetti, snips of hair, poems, postage stamps, fabric & fiber, food labels, sheet music, on and on... One thing to note, make sure objects do not contain any moisture, as in wet glue, when you solder. The heat may cause steam to get trapped in side and will ruin your project. Don't get anything that melts or burns easy close to the edge of the project so the heat will not harm it.
End of Part 1.
Go start collecting stuff to put in your slide sandwich and check back here soon for part 2!! Part two will feature more instructions, samples and resources for where you can get the supplies mentioned above.
Subscribe to:
Posts (Atom)


