Saturday, July 26, 2008

Collaging Freely with Constraints - Collage with Freedom of Expression While Using Instructions

When I boil it down, the most constant thing about the art I produce, buy or drool over is that it all contains elements of collage, and usually incorporates text or handwriting. For years I have made cards and gift tags using pretty papers in layers then rubber stamped with multiple designs and distressed and aged them with paints and inks. Then I always like to add a dimensional embellishment or two. When I make my fine silver jewelry using metal clay, I treat it almost as I do paper by layering multiple rubber stamped images, text and textures behind an element that has dimension. I often embellish with a sparkly stone and distress & antique it. This is collage, but my 'paper' is silver clay. My soldered microscope glass pendants & several of the other pieces I offer are obviously just collage art sandwiched between glass. Even in my fine art paintings and photography... there is always text, texture, layers, antiquing, and distressing going on. Heck, I think I love Photoshop because it allows me to collage digitally.

FREEEE-DOM!!! (Shouted like Mel Gibson in Braveheart) The best thing about collage is it is so free!! There is no right or wrong way to do it. Also, there's no true planning or pattern needed unless you want to do it that way. Never one for reading instructions or recipes, I love to just dive in and see what happens. Collage is always a surprise in the end.

There are some people who appreciate collage but find it difficult to do collage because it is so free. Some feel more comfortable having a set of instructions to go by. A lot of people are perfectionist and like things aligned perfectly, etc. For those folks, here's a technique to try that will having you collaging freely while providing the comfort of following instructions at the same time:

Little Squares Collage
Materials:
8x10" or larger piece of water color paper, canvas or board for base
Matte Decoupage Medium
Small foam brush, paint brush, old tooth brush
Acrylic paint in white and 2 colors (any colors but black or white - close your eyes and pick)
Permanent black ink pad (Like "Stays-On" brand)
Pencil
Old magazines or books
Masking tape, Staples, needle & thread or eyelets for non-glue connection
2 or more pieces of patterned scrap booking paper that match your 2 paint colors
2x2" paper punch or scissors and ruler
2x2 piece of solid color textured fabric (burlap, velvet, denim, fake fur, felt, lace) in matching color

Instructions to follow (or not):
1. Paint your base with one of your paint colors. Before it dries, use a medium brush to paint 4 quick & dirty circles as big as will fit on the base side by side with the other color of paint. Smears and accidental paint blending is good! When the paint is dry, quickly pounce & swipe your black ink pad here and there on the background then lightly daub it all around the outer edge of the base.
2. Use paper punch or scissors to cut out 2x2" size:
3 squares of paper that are more than 70% black text on white from a book or magazine. Try to get a variety of text size and fonts.
*6 squares from your scrap booking paper
*1 square that contains a human element such as an eye, hand, foot or face.
*1 square filled with a natural element image (sky & clouds, water, a leaf)
*1 square of fabric
3. Run the edges of all of the papers across the black ink pad quickly. Don't be too careful.
4. Use the foam brush to paint a thin layer of decoupage medium to adhere squares to the base in this manner:
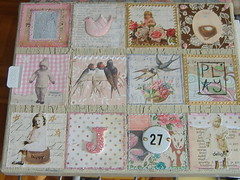
*Place squares in rows - 3 squares x 4 squares like tiles leaving a space between the squares. (You can be as careful or carefree as you want while spacing these out.)
*In each of the rows containing 4 squares, place one of the text squares, 2 scrap booking paper squares and one of the single squares (human element, nature element, fabric*) in any order.
*For fabric, the rule is you must connect it in any way other than glue and the connection method must show. You can staple, stitch, use eyelets, use masking tape to tape around the edges, etc.
5. Use a pencil to write the following in cursive any scrapbook paper square:

*Any verb
*Any noun

*Any adjective

6. Cut out words or letters from book/magazine to form a 3 word sentence about any human emotion, action or trait (examples: "I was dreaming", "Then she smiled.", "I cried out.", "I crave popcorn.", "He was strong.", "She hates Paris.") and decoupage it to a scrap booking square.
7. Mix a blob of white paint with water on a plate so that it is about as thick and 1/2 and 1/2 creamer. Dip a dry toothbrush in the paint. Point the end of the toothbrush at your collage keeping it around 4 inches away, then rake the bristles towards you with your finger or the end of another brush. This should cause little speckles of paint to flick on to the collage. Move the brush to another area and repeat 2-3 times.
8. When the specks are dry, sign the piece with permanent ink pen then brush the whole collage (except for the fabric) with decoupage medium using criss-cross strokes. If the pencil or magazine blurs or there's bubbles, it's OK!
9. When the medium is dry, crinkle up a paper towel or sheet of paper and dampen it slightly. Then dab it on the black ink pad. Lightly swipe it across the surface of the collage randomly to antique portions of the top coat.

Voila! You just made a piece of collage art!

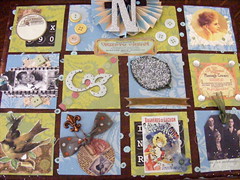
If you like the look of warm, nostalgic & antique-ish art, just change the above instructions as follows:

  • Select honey gold and chocolate brown paint.
  • Use Walnut brown ink instead of black
  • Spatter and swipe with creamy ecru paint instead of white
  • Use vintage sepia photos, text from old yellowed books and vintage ad print instead of modern magazine clips
  • Use vintage motif scrapbook papers or old maps.


Here's a couple of examples of cool collages found on flickr using a somewhat similar technique. (Click on the links to visit the artist's page):


Collage Received
Originally uploaded by sixaguilars

Sunday, July 20, 2008

Diamonds? No. Diamond Glaze is a Girls Best Friend

***** SEE AUG 15 20080 UPDATE TO THIS POST*****It finally slapped me in the face today that "Diamond Glaze" by Judikins is recommended just about everytime I read instructions for a jewelry and paper related product in any magazine, book or blog. I know it has been around for a while, but none of my local stores seem to carry it so I had not tried it myself until a month or so ago when visiting my crafty mother-in-law. I tried it. I liked it. I tried to find it and buy it, but to no avail. Today I decided to find it online. I Googled "Diamond Glaze" and also checked Etsy supplies and was amazed at all of the rave reviews and usage ideas that came popping off the page.

Maybe Marilyn had it wrong... it's not "Diamonds are a girls best friend". It's DIAMOND GLAZE. This stuff is amazing.

Here's what other people are saying:

"I LOVE this stuff! I use it on almost every layout! You can use it as an adhesive, or as an enhancer to any item - paper or not. I've used it to fill in conchos to make typewriter keys. I've used it on flowers to simulate dew. On water to simulate movement. You can mix it with a few drops of refill ink to do stained windows. It ROCKS~! " (
www.scrapjazz.com/reviews by "PrincessDallas")

"I love this stuff. It's great as a glue, especially for see-through items like watch crystals and works as a great glaze too. Follow the instructions and you won't be disappointed." (www.scrapjazz/reviews by "Dreamweaver")

"Judikins Diamond Glaze is a dimensional adhesive that dries to a clear glass-like finish. Why buy five when one will do? Dimond Glaze is an adhesive, glaze, medium, paint, and lacquer all in one: Judikins Diamond Glaze securely holds Vellum, Embossable Window Plastic, glass beads, glitter and many other mediums! Unlike other clear adhesives, Diamond Glaze is mixable with dye-based inks, watercolor, and pearlescent pigments. Use this liquid lacquer directly over artwork, chalking, or embellishments for a raised glass-like finish. Thin with water for a lacquer-like finish. This is one of the best adhesive for gluing glitter, beads, glass, plastic and vellum" (
www.scrapbook.com store)


Check out this long review including a few tips on Ebay Reviews. And there's many, many more rave reviews and uses mentioned out there.

So what is this stuff? It is...

  • Acid Free
  • Perminant when dry, but easy soap & water clean up for brushes.
  • Medium for dye inks, pigments, micro powders, chalk, pearlescents
  • Top Coat sealer
  • Adhesive for many things including paper, glass, glitter
  • Light resin for thick glassy coatings
  • Paper embelishment. Make certain parts look 3-D by topping with a shiny coating
  • Decopage medium for clear objects

It is not....

  • Waterproof
  • Scratchproof
  • Non Yellowing when applied thick
  • Good for use on fabric
  • A heavy duty adhesive. Best for paper and light items.
  • Fast drying. Times depend on thickness.
  • Bubble free. Never shake the bottle. Pop bubbles with a dry paint brush.

Cool little project using Diamond Glaze that demonstrates how to pop the bubbles too!


Here's some resources for the little frame charms like the ones used in the video.

http://brightlingsbeads.com/picture-frame-charms.html

http://www.rubbernation.com/servlet/the-CHARMS-cln-Photo-Frame/Categories

http://www.smallstudioproductions.com/Emporium/bibelots.html

http://www.artchixstudio.com/mall/abimage.asp

Here's a resource for some fun shaped LARGE frames you can collage in:

http://www.hhhenterprises.com/ezines/07-18-2008/home.html

You can find Diamond Glaze here:
or try before you buy...
Judi Kins offers FREE SAMPLES!!!
http://www.diamondglaze.com/sample.html


Have Fun! I know I will. =o) Happy crafting.

Monday, July 14, 2008

New Flickr Group - Big Beautiful Bling! Handmade Plus Size Jewelry

Hi, Just popping in to say that I just started a new group on flickr photo sharing yesterday and we already have 14 members! Yea! The group is called "Handmade Plus Size Jewelry & Fashion Stuff -Big Beautiful Bling" and it is a place for creative types to show off the stuff they make that is especially for us folks of size who like to add a little sparkle and pizazz in what we wear.

Why is it that the worlds population is now made up of a larger percentage of plus size people than ever (a rapidly increasing percentage), but most of the clothes, jewelry, belts, purse straps, shoes, etc. are still made for our tiny friends?

The group will showcase the artisans who are kind enough to accommodate a wider range of sizes. And it is a place for Big Beautiful people to post pictures of themselves wearing handmade plus size accessories too. I have posted a few of my large size rings and necklaces there and there are other pretty items posted already and will be more soon!

If you are a BBW, please come check it out. Many of the artist have online shops too, so if you are interested, look in their profiles or email them to find out how you can get their products.

www.flickr.com/groups/bigbeautifulbling


"Beauty in Boldness - Bracelet" Originally uploaded by ocbaby


plus size apron
Originally uploaded by OriginalsbyLauren

Sunday, July 13, 2008

Learn Photoshop for Free

Hello, Photoshop CS or Elements & Lightroom are pretty much industry standard software for working with photos these days. If you are a digital photo pro or graphics person, scrapbooker, etc. you pretty much have to know PS or an equivelent (which in my opinion, there are none, but that is only because I know PS best).

There are classes offered at any self respecting art or vocational school and most community collages, but they can be pricey and time consuming. Don't forget there is a lot you can learn from library books and online resources for free. I just added a resource on this blog offering some tips on PS that you might find helpful. Please check it out in the side bar.

How to Create Soldered Glass Slide Jewelry, Part 4 - Tips & Troubleshooting

Over the last few months I have blogged about creating soldered glass slide jewelry using the techniques learned in the Simply Swank soldering class that I took and some things that I had learned elsewhere. A few months down the road, and I still cannot claim to be an expert on the subject, but I have learned a thing or two and improved my technique I think, so I want to share in case it might help someone.

Most of the things I am about to say will cause you to say, "Duh!" because they seem obvious, but it's easy to get so in to the art part that you forget the common sense part. At least it is for me. =o)
This assumes you have already read my previous soldering blogs parts 1, 2 & 3... If not, ya might want to check 'em out.


Tips
1. Don't solder naked! A. Because it's just not pretty and B. Because solder & flux can splatter and drip. Make sure you solder over a heat resistant surface. Make sure your hands are higher than the molten solder at all times so you cannot get burned if it runs and drips. Wear shoes. Wear safety glasses. Wear a mask. Wear a smile.

2. Gravity applies to molten solder. Pay attention to the angle of the piece when you are soldering. It's natural to want to tilt the piece back to get a better view of the solder you are trying to add to the front, but don't be surprised when the solder runs to the back. You can use gravity to your advantage to manipulate where the solder goes. You can also use it to remove excess solder. Melt extra solder and push it off the end that is pointed towards your heat resistant work surface.

3. Always keep your soldering tip silvered and keep a spare soldering iron tip on hand. Wipe the solder tip on a wet sponge often while in use to keep it clean and from overheating. Don't leave the iron idol just cooking away. Unplug it if you are not going to use it right away. They do wear out because of the extreme heat. Tips can become pitted and can quit working right in the middle of a project. If the tip no longer appears silver, it will not work properly. See the troubleshooting section below for more information.

4. Don't mix ammonia with blackening agent. If you will be using a patina, it most likely contains an acid that is very toxic and corrosive. Most become extra nasty if combined with ammonia. Guess what is in your average glass cleaner that you probably use to clean your slides? That's right... ammonia. Do NOT mix. Use gloves, eye protection and major ventilation and follow all of the manufacturers cautions to a T when using patina. Dispose of leftovers appropriately. I recommend not pouring this stuff into a cup to use it, but sit the bottle in a big non-tipsy bowl, open it, and use a long wood handle Qtip (like the doctors use to swap a throat) to dip into the bottle. Pull the swab out, then immediately seal the bottle and apply the patina to the solder. This way there is minimum exposure and little waste to dispose of. Wear gloves. The stuff can burn skin.

5. Smoke goes up. Duh, right? But solder smoke in particular likes to rise strait up quickly in little bursts. If you are leaning over the item you are working on, it will go straight in your face & up your nose. This smoke is unhealthly at the very least even when it says "non-toxic solder". Certain solder fumes can cause lung disease over a long exposure. Do NOT breath the smoke. Wear a mask with the proper filtration rating, use fans and good ventilation. Don't hover over the item you are working on.

6. Gravity applies to hot soldering irons. Most soldering irons have heavy duty stiff cords that may actually weigh more than the iron itself. If the cord dangles off the side of your work surface, it may actually pull your soldering iron over the edge too which would be really bad if it is hot. Use a soldering iron stand with a heavy base, and/or use a piece of duct tape to tape the stand base and the base of the cord to the work surface.

7. Remove all flux from glass and solder immediately after it cools. Flux is an acid and it will continue working and could etch the glass and discolor the solder. You can then patina the solder or polish it to a shiny silver using a solder polishing compount. To maintain the color of the solder, seal with wax. You can get the patinas, compounds and wax at any stained glass supplier.

Troubleshooting
Here are a few common problems and some likely causes why they might occur.

The copper tape lifted off the glass during soldering or after - The tape had a spot of poor adhesive, or it was not burnished to the glass thoroughly before applying flux and the flux got under it. This can be even more of an issue if you use multiple strips of tape vs. one continuous piece.

The copper tape got a hole in it while soldering or stuck to the iron - The soldering iron was held in one place for too long or you went over and over the same area trying to smooth the solder. If you can, try pealing it off or covering with new tape, flux and solder again.


There are tiny pinholes or bubbles in the solder - Your copper tape is not good quality or it was not adhered well and the glue melted up through the solder when it was heated. Or you used too much flux and it boiled and made bubbles.

The soldered edge is skinny on one side and fat on the other - This is most likely because the copper tape was not centered on the glass edge. Or it could be that the glass was tilted during soldering so more solder flowed to one side than the other.

The soldered frame is crooked - Most likely caused by not putting the tape on straight. If the tape is crooked, you can use an exacto knife to trim before you solder or remove and put a new piece on.

The glass broke - A single area of the glass got too hot during the soldering process because the iron was held in one place too long. Or, the items sandwiched between the glass were too lumpy. Lumpy items must be balanced with other lumpy items of equal height between the glass so the glass cannot teeter-totter and get stressed enough to break.

There is fog or moisture under the glass - The items between the glass were moist, probably from glue that was not yet dry. The heat of the soldering iron created steam. Or, after soldering, cleaning solution or other liquid ran under the solder. Solder does not make a watertight seal. Items should not be worn in the shower or even in heavy rain.

My soldering iron will no longer melt the solder - Or the solder gets stuck to the tip. Verify that the melting point of the solder you are using is low enough to be melted by your iron and that your iron is fully heated. Check the iron tip. If the tip of the iron no longer appears silver even after wiping on a damp sponge, try sanding it with sanding paper (while it is cool) to re-expose the silvered tip. Heat and resilver the tip. If that does not work, you can try a Sal Ammoniac* block. This stuff is nasty and toxic. Do NOT breath the fumes. Here are some great instructions from Volcano Arts on cleaning your soldering iron tip. If cleaning does not work, replace the tip when the iron is cool. It is easy... There are usually one or two tension screws to loosen and the tip should come right out. If it is stuck, try tapping it lightly or twisting with plyers. If all the above does not work, it may be the iron itself or the electrical outlet.

*Note, this is ammonia... as mentioned above do not EVER mix patina solution and ammonia. Store these items faw away from each other.

My solder is lumpy - Practice makes perfect. Use one fluid motion like a long painting stroke to float the solder along the tape with the iron barely touching to make the smoothest bead. Be sure to hold the tip so you are using the wide, flat edge. Also, it helps to have a good iron that keeps a constant temperature. Most importantly, flux well and often. Solder cannot flow without flux. Make sure you coat the whole section to be worked with flux but don't try to do too big of an area at once. If you flux and don't immediately solder, reapply flux.


Don't let the above intimidate you from trying soldering yourself. Yes, there are a few issues and some safety things to think about, but anyone can do it and you can produce really pretty piece that you and others will love very quickly and economically. Happy creating!


Tuesday, July 8, 2008

Love, Peace & Squiggles! and a Dove Rescue!

Today a kind fellow Etsy member selected my "Love, Peace and Squiggles" Pendant to be featured in a "treasury". I was honored to have my piece selected, but I admit I did not know what a treasury was in this context. I checked the Etsy Help and learned it is a member curated collection of other Etsy artists items that they publish as a small, temporary gallery for any reason they choose. Occasionally, the Etsy team selects a treasury to be featured on the front page which is a nice opportunity.

The treasury is called
"For Frankie" by "crookedlittlestudio" and is a collection of dove related art.

CLS writes
"Frankie is an unlikely name for a dove, but after he survived the first night (he had fallen out of his nest and had been abandoned), I named him after St. Francis, patron saint of animals. He ate, flourished, and learned to fly. Yesterday he flew away. I miss him."

Sounds like behind the "crooked little studio" a tender hearted soul who is probably much loved by Frankie the dove. Check out her wonderful artwork at the studio link above.

Thursday, July 3, 2008

SEEKING THE RAINBOW New Fine Art Print Released Today

Hello, I have just released a new art print today called "SEEKING THE RAINBOW". It is a digital painting made from 2 of my photographs worked together in Photoshop CS3. It is available as a fine art print with or without custom framing in my ImageKind Gallery (under my photography name "Kamera Kat").

(Note - It's difficult to see the rain in this small image. You can zoom in on the print on the ImageKind site.)

I would love to hear what you see in the picture. Leave a comment! =o)

This is what I see... When the storms of life rain down, delight in the promise of finding a new rainbow at the storms edge. Then, realizing that the rainbow did not exist until this storm created it, we can be thankful for the storm even while we are still in it.

"And God said, "...Whenever I bring clouds over the earth and the rainbow appears in the clouds, I will remember my covenant between me and you and all living creatures of every kind. Never again will the waters become a flood to destroy all life." Gen. 9:14

Wednesday, July 2, 2008

New Soldered Glass Jewelry Just Added to the Store!

Just a quick note about soldered glass jewelry... 1. I just released some new pieces today and there are more coming soon! 2. I am working on "How to create soldered glass slide jewelry, Part 4 - Tips & Troubleshooting.

Like anything else, there is a learning curve to making the soldered jewelry and I have already learned a few things in the short time I have been doing it. I will share what I have learned and give some advise on how to avoid and fix boo-boos. I am pretty sure I might be an expert on that now because I am quite boo-boo prone. Hopefully I can help someone else avoid them.

Anywhoo... here's a peak of some of the new pieces that are in the store or will be soon.


P.S. - I am sort of excited about the chokers because I had fun making handmade jumprings, the S-Hook closure and bale out of wire and soldering it all. It was cool using the soldering iron for something besides pendant edges.