When I boil it down, the most constant thing about the art I produce, buy or drool over is that it all contains elements of collage, and usually incorporates text or handwriting. For years I have made cards and gift tags using pretty papers in layers then rubber stamped with multiple designs and distressed and aged them with paints and inks. Then I always like to add a dimensional embellishment or two. When I make my fine silver jewelry using metal clay, I treat it almost as I do paper by layering multiple rubber stamped images, text and textures behind an element that has dimension. I often embellish with a sparkly stone and distress & antique it. This is collage, but my 'paper' is silver clay. My soldered microscope glass pendants & several of the other pieces I offer are obviously just collage art sandwiched between glass. Even in my fine art paintings and photography... there is always text, texture, layers, antiquing, and distressing going on. Heck, I think I love Photoshop because it allows me to collage digitally.
FREEEE-DOM!!! (Shouted like Mel Gibson in Braveheart) The best thing about collage is it is so free!! There is no right or wrong way to do it. Also, there's no true planning or pattern needed unless you want to do it that way. Never one for reading instructions or recipes, I love to just dive in and see what happens. Collage is always a surprise in the end.
There are some people who appreciate collage but find it difficult to do collage because it is so free. Some feel more comfortable having a set of instructions to go by. A lot of people are perfectionist and like things aligned perfectly, etc. For those folks, here's a technique to try that will having you collaging freely while providing the comfort of following instructions at the same time:
Little Squares Collage
Materials:
8x10" or larger piece of water color paper, canvas or board for base
Matte Decoupage Medium
Small foam brush, paint brush, old tooth brush
Acrylic paint in white and 2 colors (any colors but black or white - close your eyes and pick)
Permanent black ink pad (Like "Stays-On" brand)
Pencil
Old magazines or books
Masking tape, Staples, needle & thread or eyelets for non-glue connection
2 or more pieces of patterned scrap booking paper that match your 2 paint colors
2x2" paper punch or scissors and ruler
2x2 piece of solid color textured fabric (burlap, velvet, denim, fake fur, felt, lace) in matching color
Instructions to follow (or not):
1. Paint your base with one of your paint colors. Before it dries, use a medium brush to paint 4 quick & dirty circles as big as will fit on the base side by side with the other color of paint. Smears and accidental paint blending is good! When the paint is dry, quickly pounce & swipe your black ink pad here and there on the background then lightly daub it all around the outer edge of the base.
2. Use paper punch or scissors to cut out 2x2" size:
3 squares of paper that are more than 70% black text on white from a book or magazine. Try to get a variety of text size and fonts.
*6 squares from your scrap booking paper
*1 square that contains a human element such as an eye, hand, foot or face.
*1 square filled with a natural element image (sky & clouds, water, a leaf)
*1 square of fabric
3. Run the edges of all of the papers across the black ink pad quickly. Don't be too careful.
4. Use the foam brush to paint a thin layer of decoupage medium to adhere squares to the base in this manner:
*Place squares in rows - 3 squares x 4 squares like tiles leaving a space between the squares. (You can be as careful or carefree as you want while spacing these out.)
*In each of the rows containing 4 squares, place one of the text squares, 2 scrap booking paper squares and one of the single squares (human element, nature element, fabric*) in any order.
*For fabric, the rule is you must connect it in any way other than glue and the connection method must show. You can staple, stitch, use eyelets, use masking tape to tape around the edges, etc.
5. Use a pencil to write the following in cursive any scrapbook paper square:
*Any verb
*Any noun
*Any adjective
6. Cut out words or letters from book/magazine to form a 3 word sentence about any human emotion, action or trait (examples: "I was dreaming", "Then she smiled.", "I cried out.", "I crave popcorn.", "He was strong.", "She hates Paris.") and decoupage it to a scrap booking square.
7. Mix a blob of white paint with water on a plate so that it is about as thick and 1/2 and 1/2 creamer. Dip a dry toothbrush in the paint. Point the end of the toothbrush at your collage keeping it around 4 inches away, then rake the bristles towards you with your finger or the end of another brush. This should cause little speckles of paint to flick on to the collage. Move the brush to another area and repeat 2-3 times.
8. When the specks are dry, sign the piece with permanent ink pen then brush the whole collage (except for the fabric) with decoupage medium using criss-cross strokes. If the pencil or magazine blurs or there's bubbles, it's OK!
9. When the medium is dry, crinkle up a paper towel or sheet of paper and dampen it slightly. Then dab it on the black ink pad. Lightly swipe it across the surface of the collage randomly to antique portions of the top coat.
Voila! You just made a piece of collage art!
If you like the look of warm, nostalgic & antique-ish art, just change the above instructions as follows:
- Select honey gold and chocolate brown paint.
- Use Walnut brown ink instead of black
- Spatter and swipe with creamy ecru paint instead of white
- Use vintage sepia photos, text from old yellowed books and vintage ad print instead of modern magazine clips
- Use vintage motif scrapbook papers or old maps.
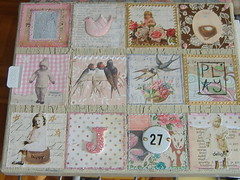
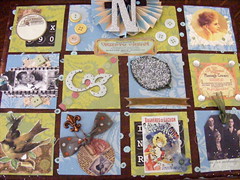
Here's a couple of examples of cool collages found on flickr using a somewhat similar technique. (Click on the links to visit the artist's page):


No comments:
Post a Comment